Thursday Tip
Welcome to the latest in a series of articles to do with enamelling and making jewellery. I hope you find them useful. I am writing about issues and problems I have experienced (and hopefully overcome), and tips and shortcuts concerning enamelling and making jewellery that I have come across in the course of the past twenty years or so. In this post I am going to tell you about how I take photos of my enamel jewellery.
Photographing Enamel Jewellery
I have spent a lot of time working at this and whilst I do not profess to be an expert, I thought it might be useful to share details of the photographic set up that I have developed. As you will be aware, if you have ever tried yourself, it is not easy to resolve the problem of lighting, reflections and glare. I spent hours trying to get good results using minimal equipment, before deciding to invest in a decent set up. It wasn’t expensive and saves me hours and hours in time using Photoshop. Just for the record, I use Photoshop Elements and find it to be reasonably intuitive and I think it is much better than any of the free options online.
Details of Photo Studio Set Up
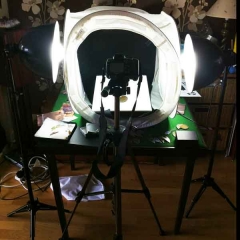
I use a pop up light tent together with Photographic Studio lights fitted with 64W energy saving 5500K daylight photography lights. Apparently 5500K is the closest to natural daylight. I use a tripod of course and my camera is a Canon EOS 400D. I have spent many hours trying to get the settings right so as to have to spend as little time as possible on Photoshop. This is what I am doing currently and it seems to work pretty well. I f anyone out there has any ideas as to how I can improve things further, I am always keen to learn.
Set the Image size to Maximum.
Manually set your White Balance, I am using WB3
P setting and adjust EV. I find +.1 works for my set up.
AI Focus
F5.6
ISO 100
Central Focus.
I use my camera on Auto Focus because I can’t get on with Manually focusing this camera.
If you have never tried to set up a camera for photographing jewellery, this may all sound double dutch. However, if you want to have a go, I hope it at least provides some pointers as to which chapters you should look up in the manual! Let me know if you have found this useful and how you get on. I hope it has shed a little light on the very tricky subject of photographing enamel jewellery and getting good results.


Join the Chat